DIY Analog Angry Birds

IMG_2662

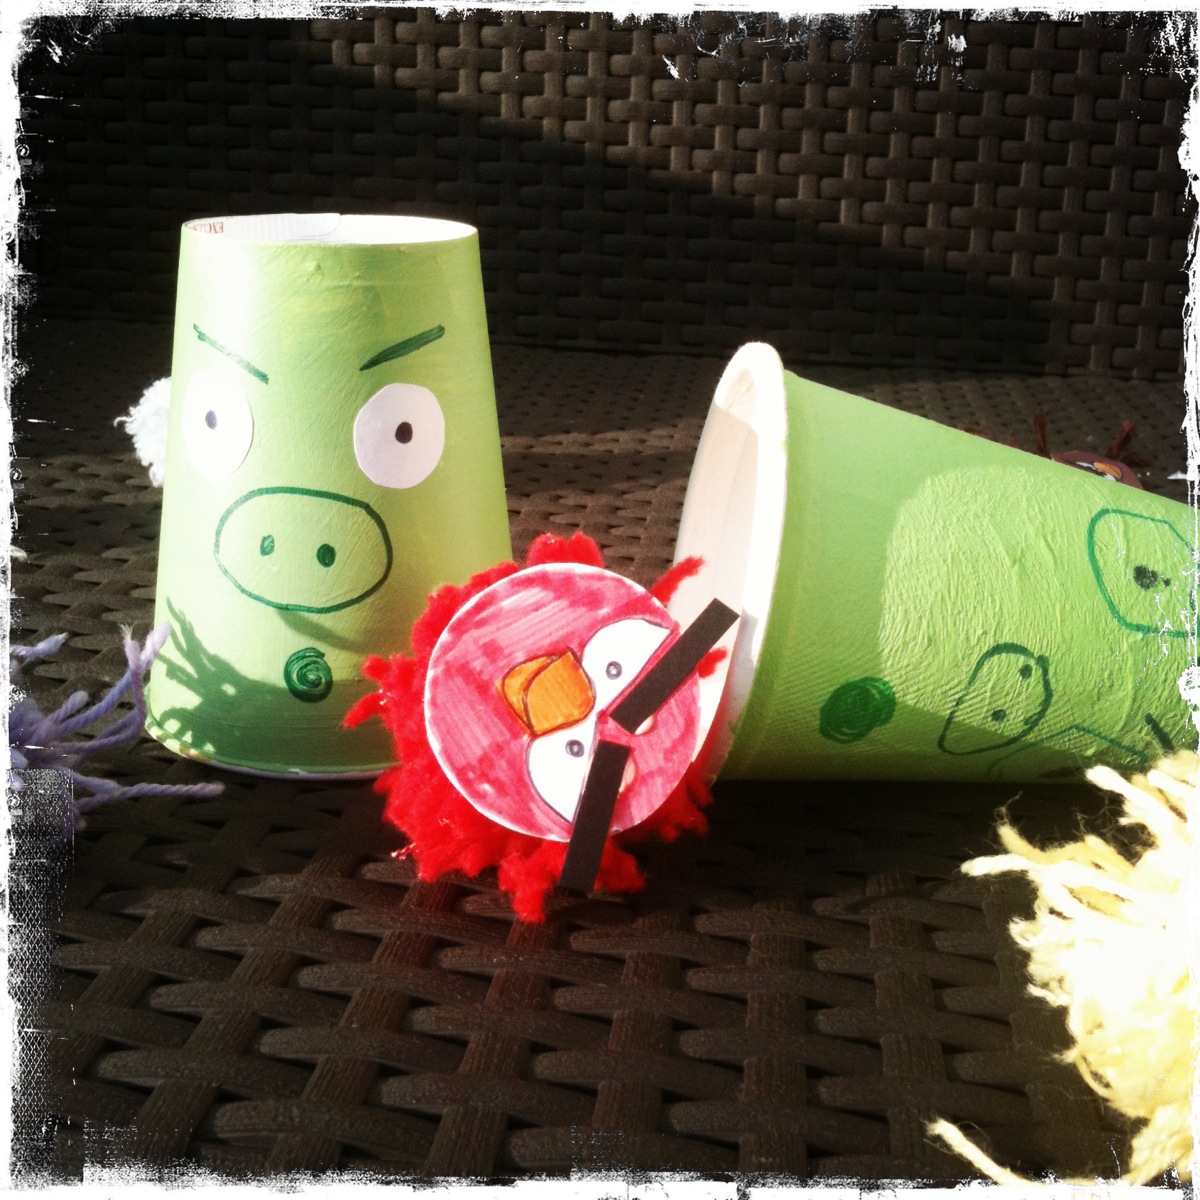
Angry Birds is a fun – but the downside is only one person can play at a time and if your mom says no more electronic devices, well then -you can’t play at all!  We have just the solution for these types of situations – it’s Analog Angry Birds – all the fun and no electricity! In fact, we don’t know if the kids had more fun making the game or playing it!

Here’s what you will need:

  • several different colors of yarn (the birds are white, blue, black, yellow and red – you can use the same colors or get crazy and use the colors you have!)
  • scissors
  • paper
  • glue
  • colored pens
  • milk top (to trace circle)
  • 5 paper cups
  • green tempera paint

IMG_2647
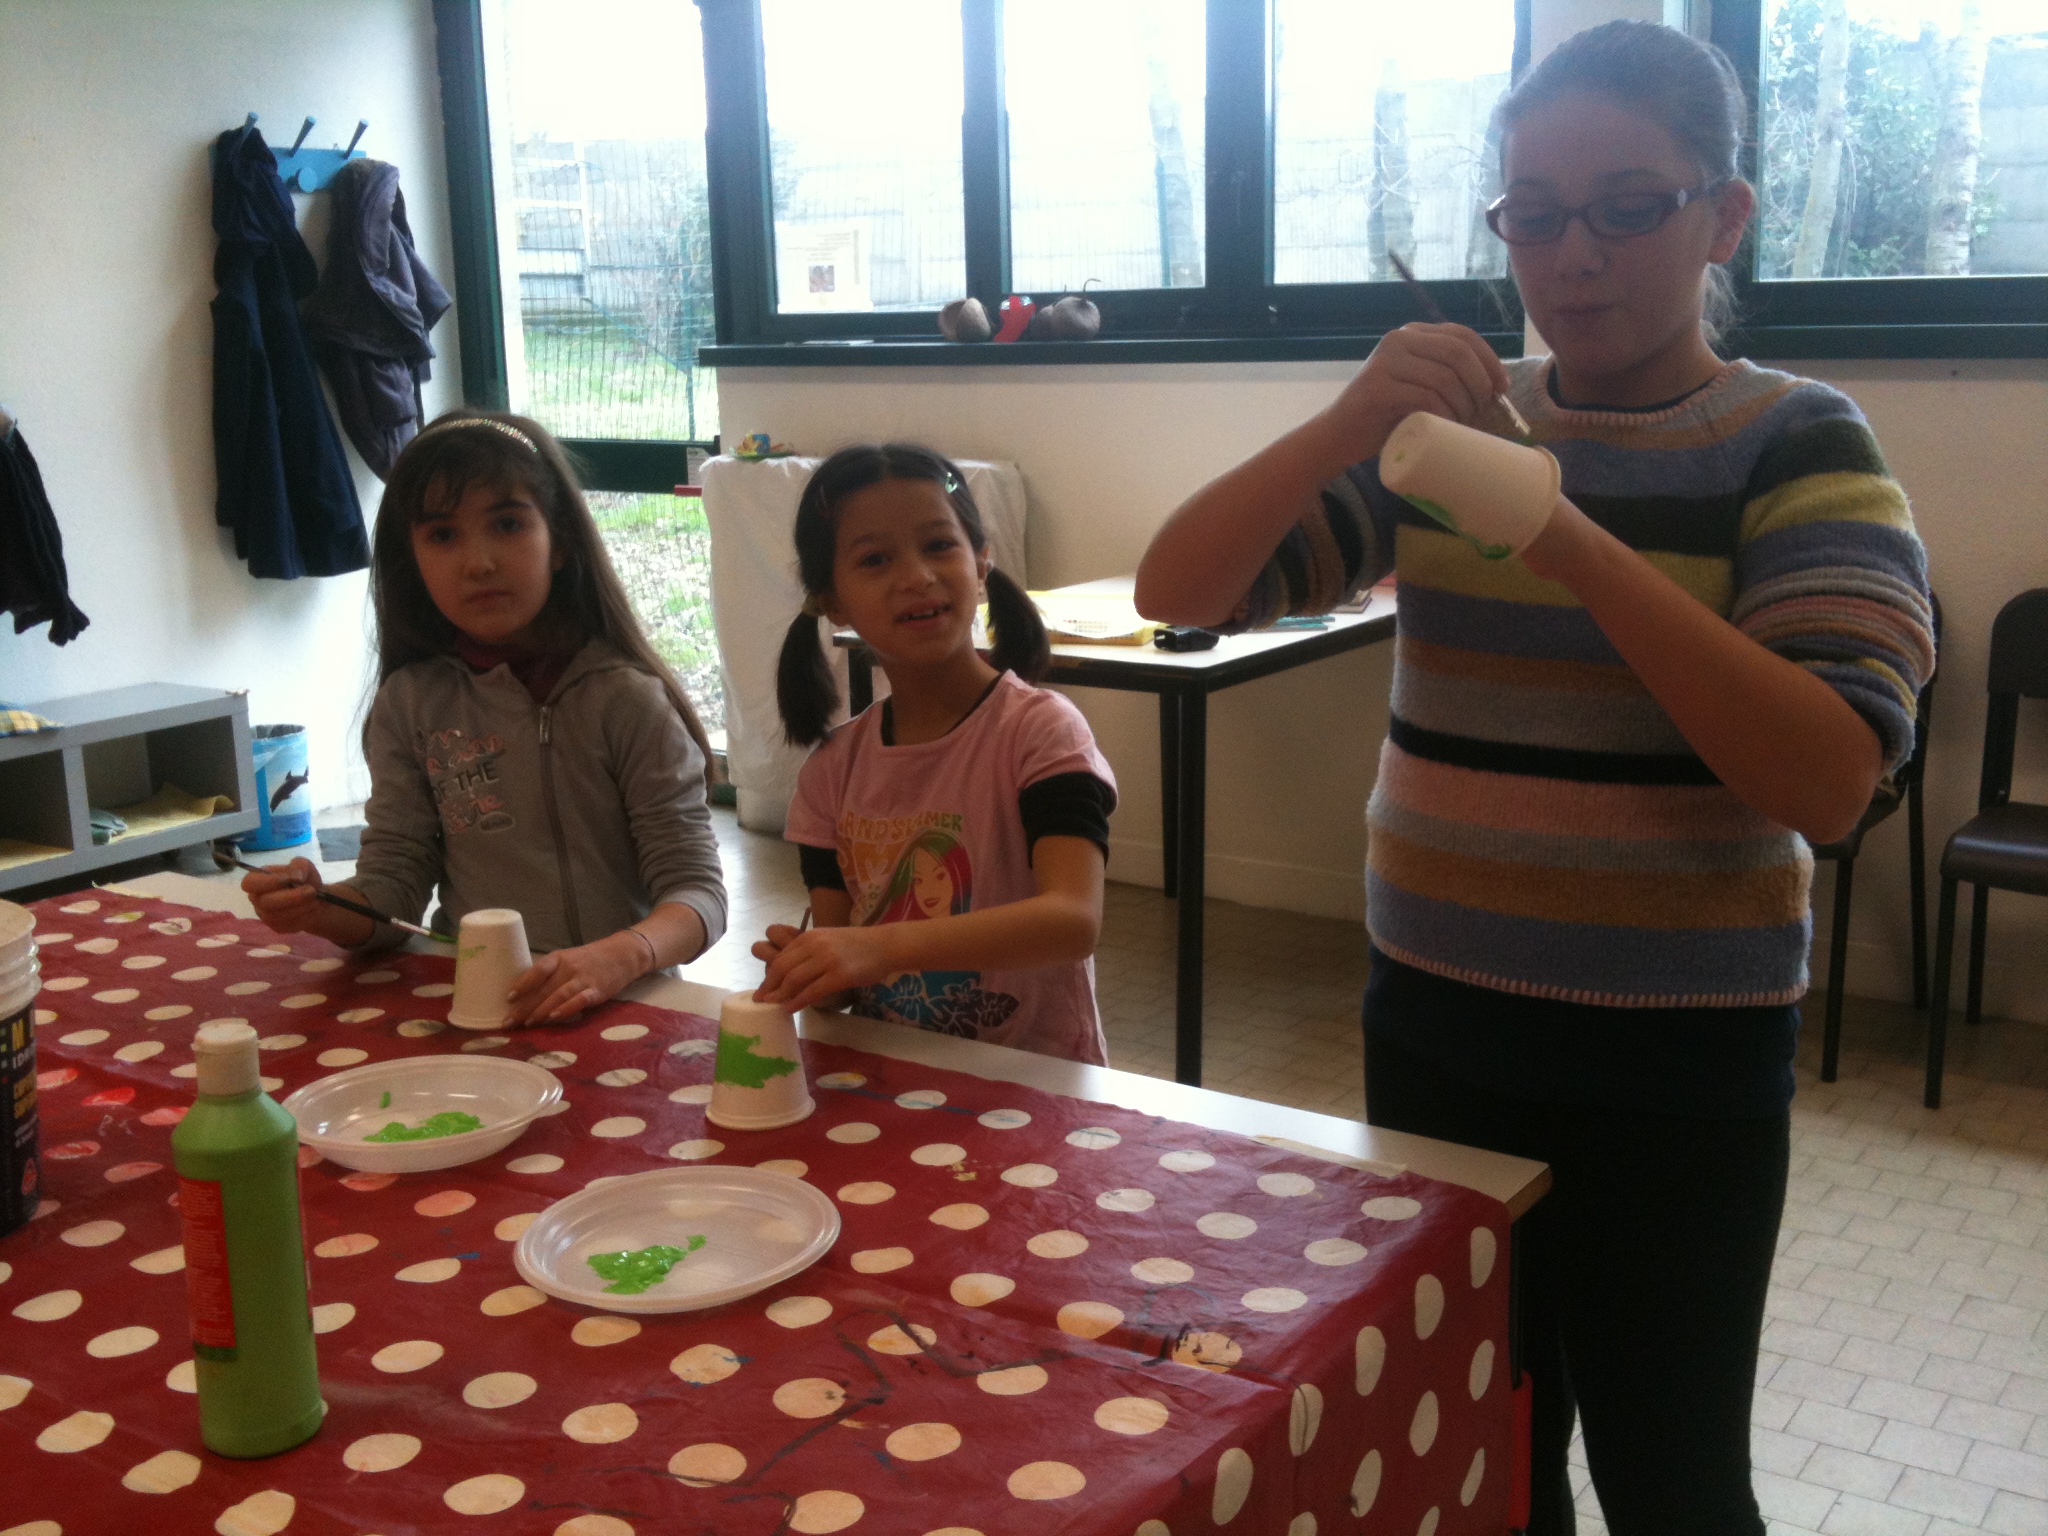
1) The first thing you will need to do is to paint your cups green.

IMG_2650
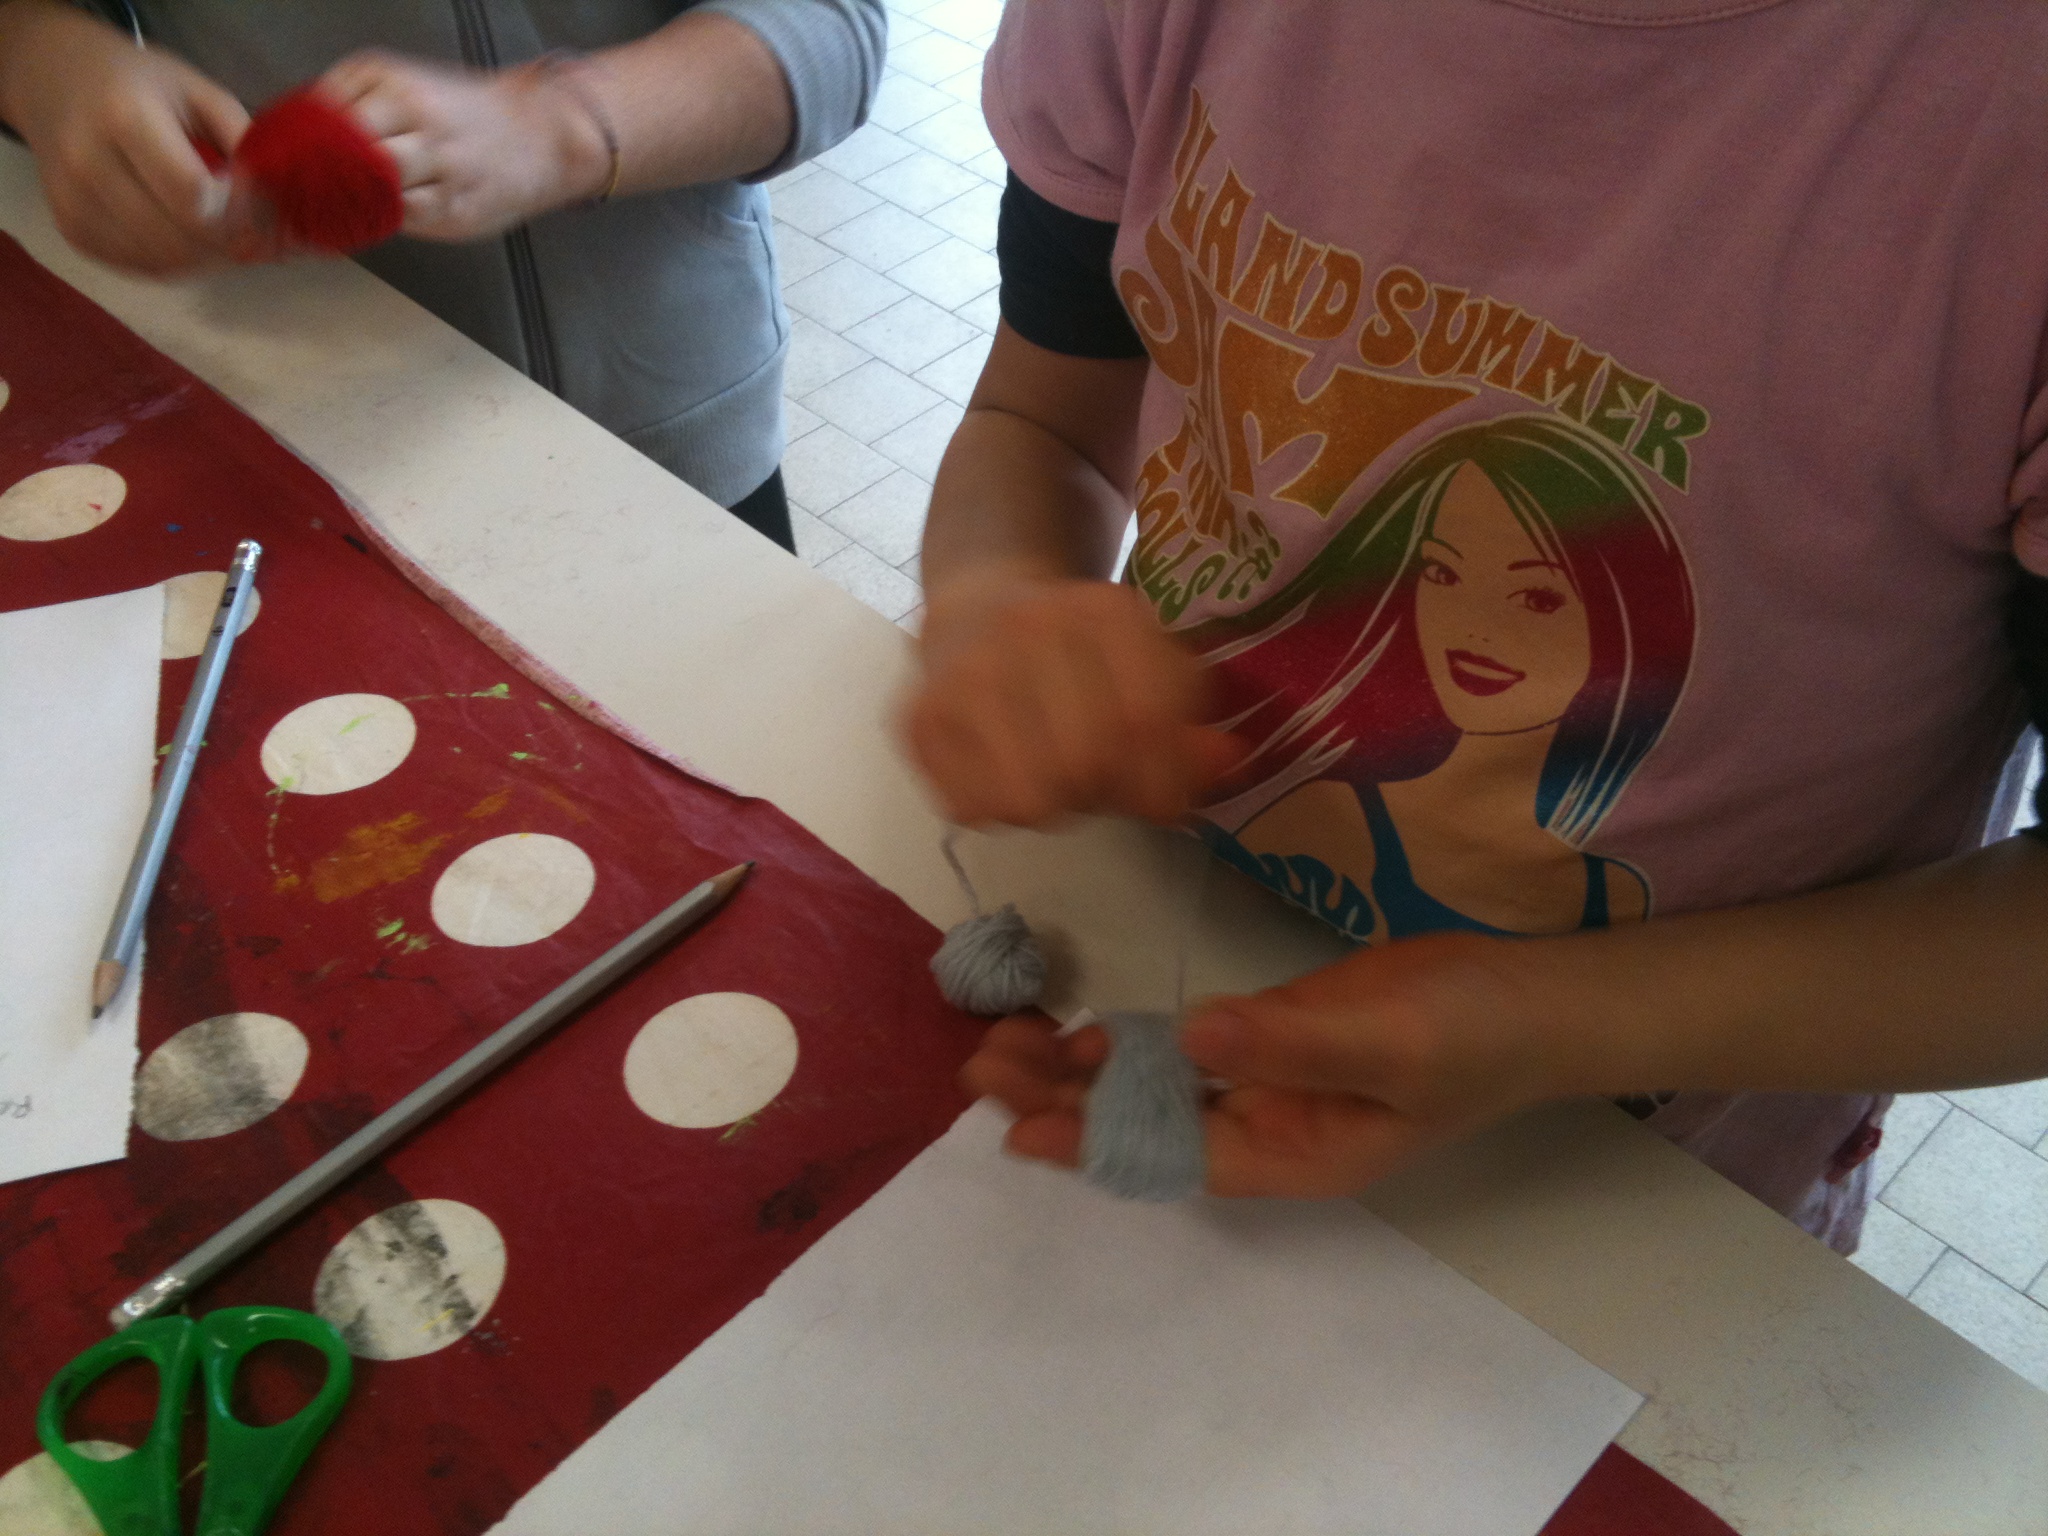
2) While the paint is drying, start making your birds.  Wrap the yarn around your four fingers (use your thumb to hold the end of the yarn when you start).  You will need to wrap several times – for the really thin yarn we went anywhere from 75 to 100 times, with the thicker yarn we wrapped about 30 times.  This was a good fine motor skill and a great way to get the kids counting.

  • -Not all of the kids can count past 10, so we counted to 10 and then put a tick mark to remember how many times we went around.
  • -The more times you go around your hand, the fuller your pompom will be.
  • – Be sure not to wrap too tightly or you will hurt your hand and have a hard time sliding the yarn off.

Once you are finished wrapping, cut off the end and slide the yarn off your hand.  Tie another small strand of yarn around the center to hold the pompom together.  Cut each loop and then roll the pompom around in your hand to fluff it up a bit.

3) Use the milk bottle top to trace a circle and then draw your Angry Bird’s face (we know what you are thinking – “hey, this could be a great lesson to do emotions”- good idea! we thought so too! you can make some happy, sad, silly etc).  Glue the face onto your pompom.

4) Once your cup is dry, draw on a pig’s face.

IMG_2661
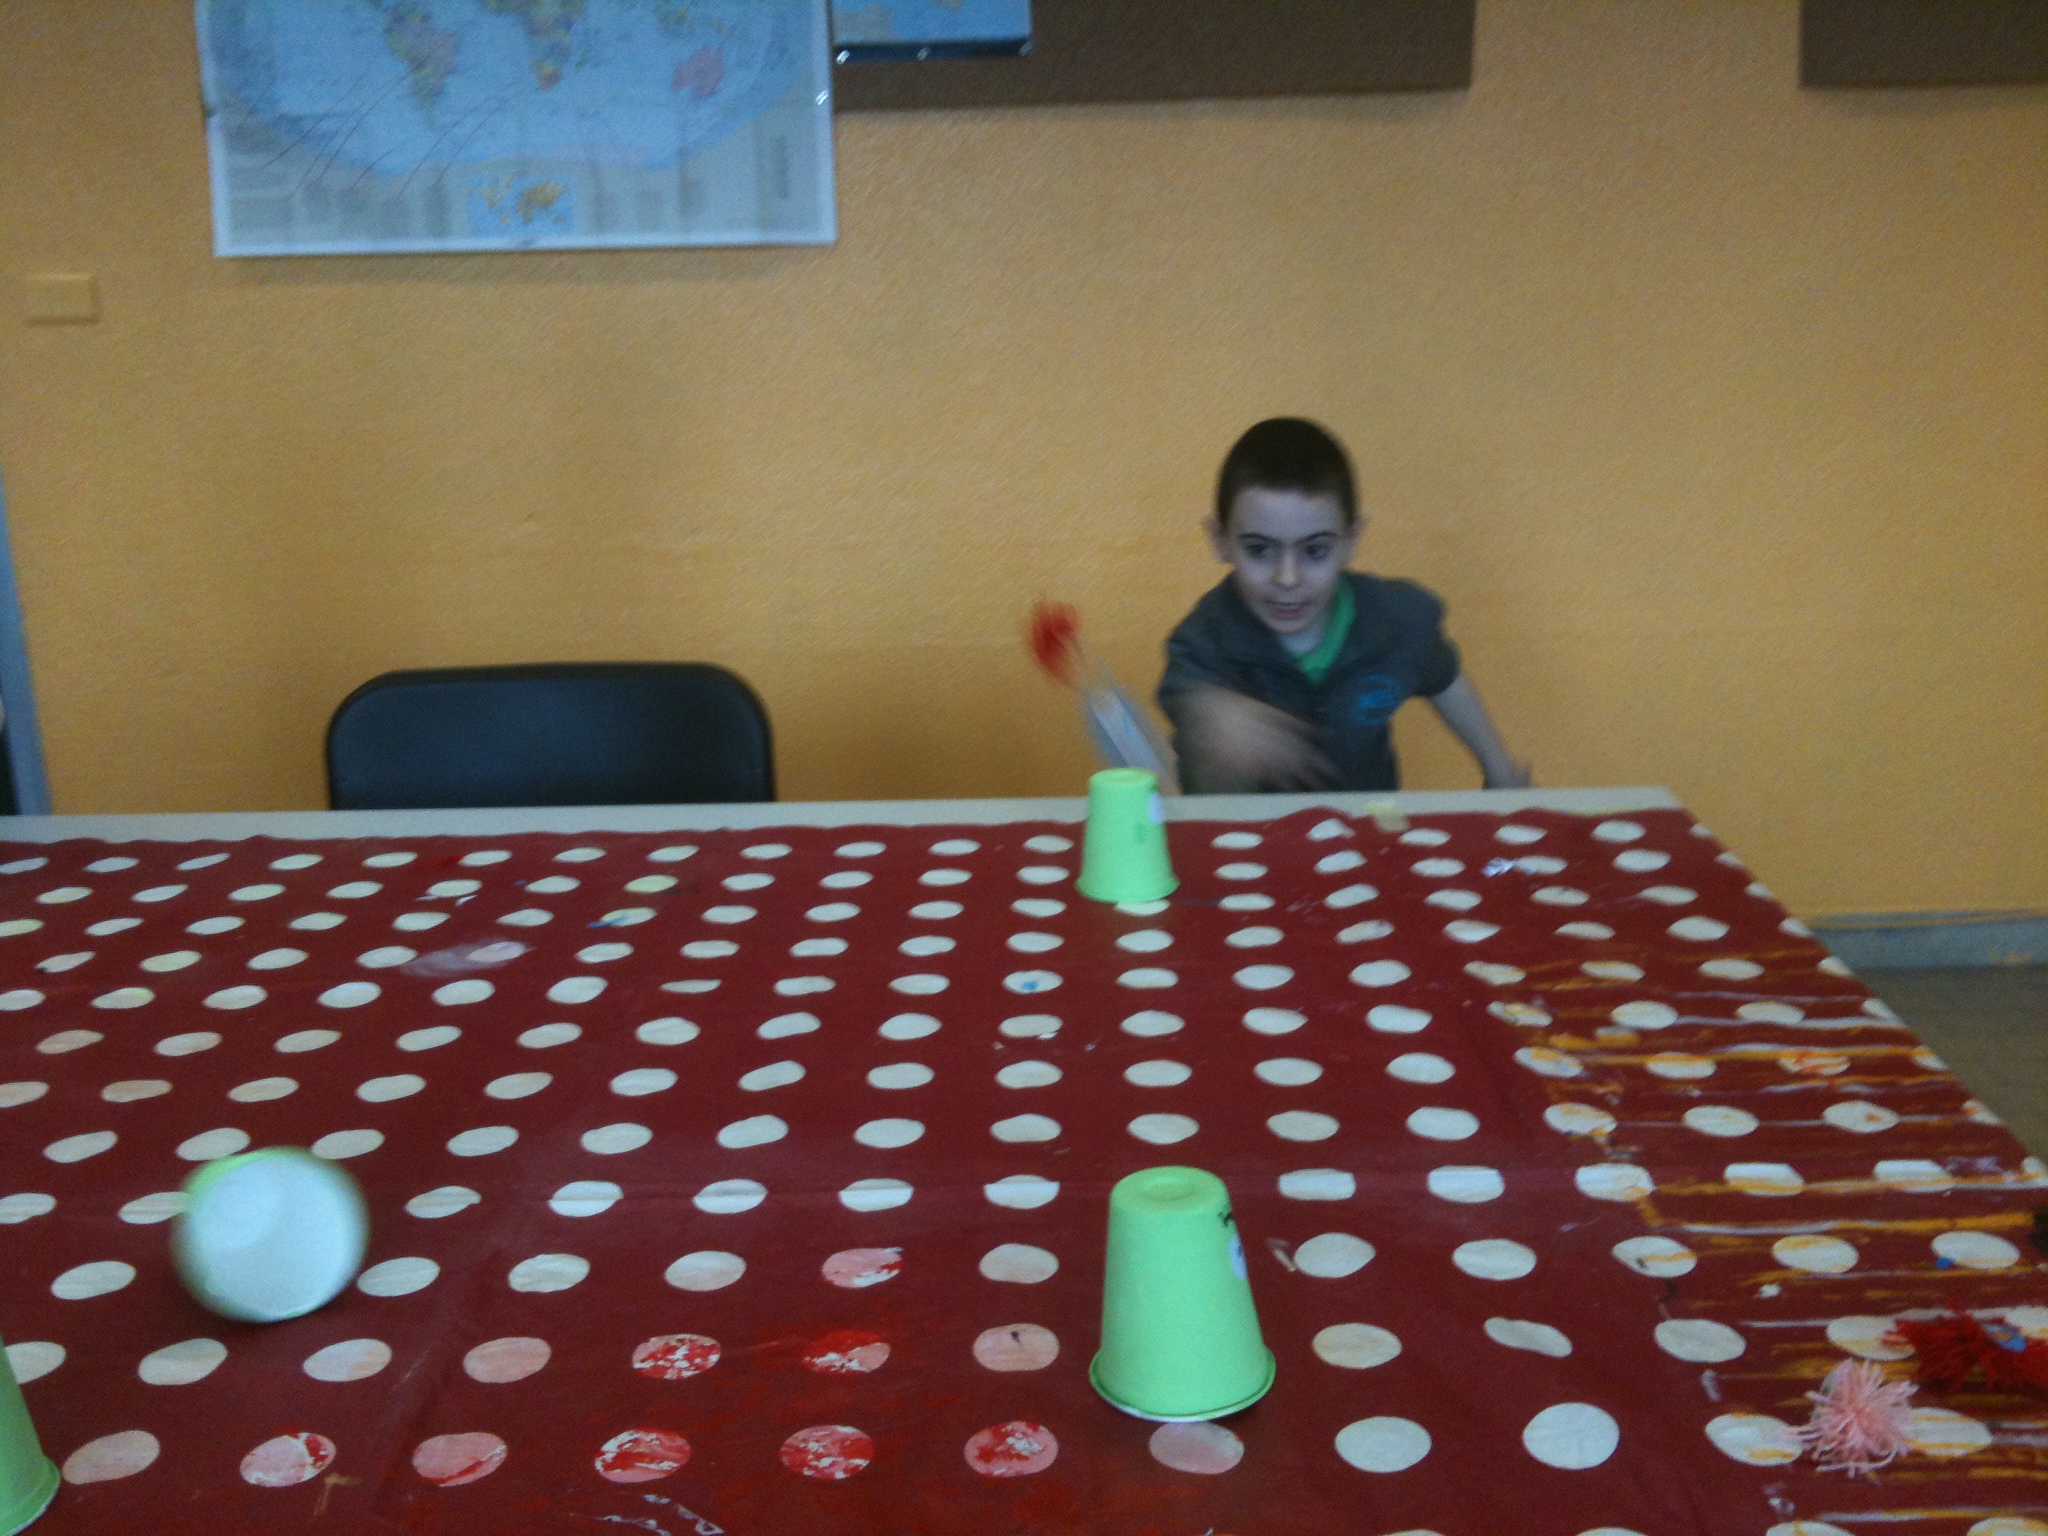
5) Now you are ready to play!

Thanks to make and takes for this funtastic idea!


Tin Can Telephones

Old school toys are the best!  This is such a simple toy, but has lasted over the years because it is fun as well as fascinating AND it doesn’t take much to make them.

IMG_2606     Supplies:

  • 2 empty and cleaned cans
  • string
  • paper (wrapping paper, old magazines, newspapers etc)
  • glue
  • paintbrush
  • nail/hammer

IMG_2523Turn the can open side down and begin to decoupage by tearing a small piece of paper and glue it onto the can.  Keep on going until you get almost to the bottom.  Flip the can over and finish covering it, be sure to cover the lip of the can and a bit of the inside that that all sharp and dangerous edges are covered over.  (This will probably require adult supervision, especially if the can has many sharp parts that stick out).   Do the same for the other can.

IMG_2603

When the cans are dry, take a nail and hammer 1 hole into the bottom of each can.  (This will require adult supervision).  Cut a piece of string into the desired length, thread each end through the hole in the can (from the outside to the inside) and tie a knot at each end. (You can experiment with this to discover what works better or how long of a string you can use and still hear your friend).  Now you are ready to talk!

IMG_2534

Make sure the string is a bit taught or the sound vibrations won’t travel along the and you won’t be able to hear the other person. We told the kids that the phones only worked if they spoke in English – you can trick the younger kids by having them speak in their mother tongue while the line is slack and then speak in English when the line is taut :o)


A Christmas Tree Craft For Your Crafty Christmas Tree

IMG_2365Just in time for Christmas, another decoration for your tree – and you can recycle to boot!

4 pics1. Supplies:

  • recycled wrapping paper, newspapers or magazines cut into 1 cm x 5 cm strips
  • glue
  • scissors
  • 1/2 circle cut out of construction paper (about15 diameter)
  • yarn

optional:

  • yellow paper for a star
  • glitter

Step 2: Glue half circle into cone shape.  Squirt a line of glue along the bottom ridge and stick the strips of paper (decorated side down) onto the cone.

Step 3:  Once you have covered the whole bottom part of the cone with strips of paper, put another line of glue on the cone, just above the strips of paper.  Now, pull the strips of paper up and glue down (will form a loop shape).

Step 4: Keep on gluing the tiers of loops until you’ve covered the whole cone.

Step 5:  Tie a short length of yarn into a loop and poke the yarn out of the top of the tree.  (Make sure you tie a big enough knot so that the yarn doesn’t slip out).

Optional:

Step 6: Cut out 2 small stars, put some on some glue, sandwich the yarn and the tip of the tree between the 2 stars and glue closed.  This will help fix the yarn to the tree and keep it from slipping out.

Step 7: Add on your decorations.  We hole punched some sparkly craft foam and glued them on.  You could also put dots of  onto the ‘branches’ and sprinkle on some glitter.

You are finished -now you have a really cool tree to hang on your Christmas tree.

Make a Kite Workshop

Here’s how to make a very simple kite, that requires things you probably have around the house.  Here’s what you will need:

  • 81/2 x 11 or A4 paper
  • crepe paper
  • glue stick
  • tape
  • pens
  • hole punch
  • scissors
  • heavy thread
  • long skewer
  • wire cutters (optional)

Step 1: Fold the paper in half.

Step 2: With the fold side down, make a crease as indicated by the dotted line. Fold back and forth a few times so the flap will stand up straight when you fly the kite.

Step 3: Cut the crepe paper into a few strips and place into the center (of the back end of) the paper,  Glue the center of the kite closed, fixing the tails. Use the wire cutters to cut the skewer to the same length as the paper.  Fix to the kite with tape as indicated.

Step 4: After you have decorated your kite, flip it over and use the hole punch to make a hole about 1/3 of the way from the nose of the kite. (We put a little bit of decorated tape on first to reinforce the paper a little bit). Attach the string and fix with a knot.

You are ready to fly your kite!

The kids had lots of fun making their kites:

Hope you have fun making and flying yours!

Ocean In A Bottle Workshop

Per leggere questo post in italiano, cliccate qui.

This was the last workshop of the year and it was a fun one!   We made a jellyfish and put it into a bottle, so we can take the ocean with us where ever we go!

Supplies:

  • a transparent or translucent plastic bag (We noticed some bags work better than others, if they are too thin, the jelly doesn’t float as well.  Some types of plastics have a lot of static and bubbles stick to it. You may have to experiment a bit)
  • a transparent bottle with a wide mouth (the longer the bottle, the better the jelly ‘swims’ to the top)
  • thread
  • food coloring

Fold your jellyfish into a ‘ghost’ like shape and loosely tie a head  (leave a small opening because you’ll will fill the head with water later on).

Keeping the head at the top, spread out the bag and then cut from the corner to the neck. You should have 4 ‘triangles.’ Cut cut from the edges to the neck to make 8 ‘triangles.’  Cut off every other triangle, you should have 4 triangles.

Now, cut out very skinny strips for the tentacles.

You should make about 3 or 4 legs per segment, which means that you will still have to cut away some more of the excess bag.  Trim the tentacles so they will be of different lengths.

Fill the bottle about 1/2 way with water.Fill the head part way with water (you will need to leave some room for air so the jellyfish will float up).  Carefully insert the jelly into the bottle and top the bottle off with water. **

Add in food coloring and close your bottle tightly.

Turn your bottle upside down over and over again and watch your jellyfish float to the top.  It’s absolutely mesmerize.

We found this great craft on BhoomPlay on how to make a jellyfish in a bottle.

*  If you’re jellyfish is not floating to the top too well, try pulling him (or her) out of the bottle and blow a little bit of air into the head.  If you have a lot of air, the jellyfish will float to the top quickly.  If you have too little or no air, the jellyfish will float slowly or not at all.   If you find a the right ratio of air to water, you jelly will float and will full everyone into thinking he (or she) is real!

If You Give A Pig A Pancake (Mother’s Day) Workshop

Per leggere questo post in italiano, cliccate qui.

If You Give A Pig A Pancake is a story about a spunky little pig and all the silly things that happens just by giving her a pancake.  And reading about pancakes reminds us about….breakfast on Mother’s Day!

This was a very special workshop as it was dedicated to our hardworking and ever supportive mothers.  Since our moms are always waking up early and getting breakfast ready for us, we got breakfast ready for them (well, sort of), we made Pancakes in A Jar.

Supplies:

  • a clean jar (that has a volume of slightly more than a cup)
  • play dough (white and pink)

dry ingredients for pancakes:

  • 1 cup (125 g) all-purpose flour
  • 3 tbls (30 g) white sugar
  • 1 tsp (3 g) baking powder
  • 1/2 tsp (2 g) baking soda
  • 1/4 tsp (2 g) salt

 First – measure out all the dry ingredients and put them into the jar.

Next – use the white play dough to cover the lid of the jar.  Take off the excess dough so it wont go on the inside of the lid.  (The dough will slide around a bit, try and fit it on as best you can, but it will shrink as it dries and stick on a little better).

Use the pink play dough to make a pig.  Stick it to the top of the lid. You made need a little bit of water to do this. Some kids made a 3 dimensional pig sitting up, some made it stand on all four legs and some made a 2 dimensional version.  How will you make yours?

Lastly – make a Mother’s Day card with the rest of the recipe inside:

  • pancake mix
  • 1 cup  (235 ml) milk
  • 1 egg
  • 2 tbls (30 ml) vegetable oil

Pour the ingredients from the jar into a bowl.  Pour in the milk, egg and vegetable oil. Mix until smooth. Heat non-stick pan over medium heat until water beads. Do not oil. Pour pancake mixture in 1/4 cup amounts. Turn when tops are covered with bubbles and edges look cooked. Remove from heat when pancake stops steaming.

Serve hot with butter and syrup or jelly.

And now you have your very special and original gift for your very special and original mom!

Spring Blossoms Workshop

Per leggere questo post in italiano, cliccate qui.

I looked out the window and what did I see? Popcorn popping on an apricot tree.  It’s springtime!  Just the right time to make a spring blossom picture!  Here’s what you will need:

  • a sheet of light blue paper
  • white pencil
  • elmer’s glue
  • fine salt
  • brown paint
  • light colored tissue paper cut into small squares.

Use the white pencil to draw some branches of a tree.  Paint your branches with glue (do a nice thick layer).

Sprinkle lots and lots of salt over the glue.  Let the glue dry and then shake the salt off.  (We didn’t have time to let the glue dry, so we had to be extra delicate doing the next step).

Paint the salt brown.  Let dry.

Lay a square of tissue paper onto the top of a pencil (the side without the point) and fold downward, forming a flower blossom. Dip the flat part into glue and stick onto a tree branch. Keep doing that until your tree is covered with flowers.  We glued little crushed up balls of tissue paper to the center of the flowers just to make them a little more colorful.

And there you have it, a beautiful tree with lots of spring blossoms! Achooo! Just kidding these trees are hypoallergenic!

The Very Hungry Caterpillar Workshop

Per leggere questo post in italiano, cliccate qui.

The Very Hungry Caterpillar by Eric Carle is one of our favorite stories – (you can see by how many times we’ve posted about it under categories to your right).  It has the some of the very important features to look for when reading to ESL or EFL kids – the story uses a fairly simple and basic language, the story is interesting and the pictures explain the what is happening even if the kids don’t understand many of the words.  This story is also adaptable to teach different topics- the life cycle of a butterfly (also order- first, second, next etc), days of the week, counting and food.  We focused on the life cycle of a butterfly for our project. We made mobiles and this is how we did it:Supplies:

  • paper plate (or construction paper and something to trace a circle)
  • black construction paper
  • a white or light colored pencil
  • crayons or oil pastels
  • scissors
  • large embroidery needle and thread

First take the paper plate and draw a large spiral shape and cut it out.

Use the white pencil to draw an egg on a leaf, a caterpillar, a cocoon and a butterfly (we folded the paper in half and drew on the fold).  (The kids were given 12 x 12 cm squares and asked the kids to draw as big as they could – otherwise they tended to draw something small in the center of the paper – making it hard to color, cut out and see). The drawing above is not to scale, but just to give you an idea of what the pieces you should have.

Cut out the pieces and color them in.

This part may require adult supervision – cut out 4 pieces of thread about the same length (about 25 cm) and 1 longer thread (about 40 cm).  Thread the needle with the large piece of thread, poke the needle through center of the spiral (going from top to bottom) and then poke it back through again (going from bottom to top).  Tie a knot at the end.  This will be used to hang the mobile.

Now attach the other pieces.  Using the shorter pieces of thread  poke the needle through the top of the spiral, poke it though one of your pieces (leaf, caterpillar, cocoon or butterfly), poke it back up through the spiral and tie a knot.  Repeat, making sure you evenly space each piece.  The order doesn’t really matter because it changes as the mobile spins.

Here is a cute little song to sing (to the tune of Up On The Rooftop) while you are working:

  • First comes a butterfly and lays an egg.
    Out comes a caterpillar with many legs.
    Oh see the caterpillar spin and spin,
    A little chrysalis to sleep in.
  • Oh, oh ,oh wait and see!
    Oh, oh, oh wait and see!
    Out of the chrysalis, my oh my,
    Out comes a beautiful butterfly!

(We didn’t make it up, but since we’ve seen it on many other sites, we can’t cite it since we don’t know who to give the credit to – but nice job whoever it was!)

Father’s Day Workshop, A Totally Quiller Keychain

Per leggere questo post in italiano, cliccate qui.

Father’s Day is the 19th of March in Italy, so the kids made a special present for their dads – a totally killer quilled key chain.

What’s quilling you ask? It’s taking strips of paper and curling them into spirals, you bend those spirals into different shapes and put them together to form an animal, a flower or whatever you want.  Check out Inna’s Creations for some basics on quilling and other great ideas.

Here’s how to quill a fish key chain:

Supplies:

  • colored paper (A4)
  • ruler
  • pencil
  • wooden skewer
  • elmer’s glue
  • Modge Podge or watered down elmer’s glue
  • old paintbrush
  •  needle (a big one)
  • embroidery thread
  • key chain ring

You probably have most of the things in the house, so this is a great impromptu activity – like on a rainy day, when you’re stuck inside and you don’t know what to do!

1. Use your ruler and pencil to measure out 4, 1 cm strips along the length of the paper. Carefully cut them out.

2. Take two strips and glue them together at the ends, so you have one long strip.

3: Fold one strip in half and cut it along the fold.

4.  There should be 4 strips total, 1 long, 1 medium and 2 short.  Take a short strip of paper and twirl it around the skewer and then take it off.  You should have a spiral. Do the same to each of the other strips.

5. Put a dot of glue on the end of each spiral and glue it closed.

6 Now comes the tricky part – you will need to make pinch and bend the pieces to make different shapes which will form the parts of the fish.

7.  Take the large spiral and pinch the ends to form an ‘eye’ shape -this will be used for the fish’s body.

8. Use your index finger and your thumb of your left hand and the index finger of your right hand to squish the two small spirals into triangles. These will be the fins.

9. Use the thumb and index fingers of both hands to squash the last spiral (the medium sized one) into a  crescent moon shape.This will be the tail.

10. Pass the needle with embroidery thread through one side of the eye shaped piece, make a loop and tie a knot.

11. Glue each of the pieces together to form a fish. Let these dry.

12. When you are finished, use the paint brush to pass Modge Podge all over the fish – on the top and the bottom and the sides.  This will make the fish harder.  When it dries, hook the fish onto a key chain ring and you are finished!

When it dries, wrap it up and give it to your dad on Monday.  Make sure you wish your dad a Happy Father’s Day from all of us at ARTiculation360.

Animation (Flip Book) Workshop

To read this in Italian, click here.

Saturday’s workshop was probably the one of the most challenging, but fun workshops yet, we made flip books -which are basically a series of drawings that seem to move, as the pages are rapidly turned. This is a great activity to do for transit verbs (a fiish swimming, a plane flying etc) or to teach stages (a seed growing into a flower or a tree) – Keep in mind that the best ideas are the simplest ideas – especially if it is your first time animating.

What you will need:

  • a pencil
  • colored pencils
  • post-its
  • a stapler
  • tape (masking or scotch tape)

For younger kids, it is easier to grasp the concept if they have an example.

1.  Print off one of the sheets above.

2. Put a post-it on top of each frame (keeping the sticky part on the left hand side) and use a pencil to lightly trace each drawing.

 *If it’s hard to see the lines, you can always put the sheet against the window and then trace.

3. Color each of the frames (make sure that you color every frame in the same way -for example: if you color the flower yellow with a green stem, it should be yellow with a green stem in all the frames),

4.  Write the title of your flip book on a post it.

5.  Take 2 blank post its and set them on the table (this will add pages to the book and make it easier to flip).  Stack the your drawings on top of these 2 blank post-its, in sequence working from frame 8 to frame 1 (so frame 8 should be on the bottom and frame 1 on the top). Take 2 more blank post-its and put them on the top. Stack you title page on the very top.  Stack as neatly as you can, the neater it is, the easier it will be to flip.

6.  Bend the left side of your book back about 5 cm.  This will make the pages stiffer and easier to flip.

7.  Staple the ‘binding’ and secure the staples by covering them with a strip of tape.

8.  Now flip!

Older kids may be able to grasp the concept of how to draw a flip book on their own. Here’s how to do it:

1.  Think of something that can move from left to right or up and down (without having to draw many complicated movements.  For example a fish swimming, a plane flying through the sky, a car driving on the road, a hot air balloon rising in the sky, etc.  A person walking is quite or a horse running is quite complicated and won’t work well for the method we are using.

2.  Draw your idea on a post it, keeping the sticky side to the left. We have drawn a spider that will lower itself down it’s web.   If you are going to have something go from up to down, like we are, make sure the drawing stays on the right hand side so you can see it as it flips.

3. Take another post-it (post -it #2) and put it on top of the first post it (post-it #1) so that the right edges are lined up, but the top edge of #2 is slightly above #1.  Remember to put the sticky side on the left.  Trace.  See how our spider looks slightly lower.

4.  Do this again and again, until you have at least 8 drawings. You can have more than (, because the more drawings you have and the slighter the movement when you retrace, the better your flip book will work. Less than 8 drawings makes it hard to flip the book and the animation won’t be a smooth.

5.  Color all your drawings.

6.  Neatly stack (in order) all your drawings, starting with the last one on the bottom.  (If you have only 8 drawings add 2 blank post-its to the front and 2 to the back, this will make it a bit easier to flip and see the animation).

7.  Make a title page and put it on the top of your stack.

8.  Fold back the left hand side of your stack about 5 mm.

9. Staple and then tape over the staples

10. You are ready to flip!