Monthly Archives: February 2012
Chiacchiere
Chiacchiere are rectangular pieces of fried dough eaten during carnival season. Chiacchere means to chat – I really don’t know why, because they are so good that when I eat them, it’s probably the only time I am not chattering!
Ingredients:
- 3 1/2 tbls Butter softened
- 4 c Flour
- 2 Tbls Grappa
- 2 1/ 2 tsp Baking powder
- pinch of salt
- 3 whole Eggs
- 1 Egg yolk
- 1 tsp Vanilla extract
- 1/3 c Sugar
- oil for frying
- powdered sugar for dusting
Sift flour and baking powder together onto a flat surface and form a ‘volcano.’ In the center add all the remaining ingredients (except for the oil) and kneed until the dough becomes uniform and elastic (approx 10 min) Put in a bowl, cover with plastic and let rest in a cool place for about 30 min.
Roll out dough to about 2 mm thick. Fold into 3rds and roll dough again. Do this 3 or 4 times so that the dough will be uniform and compact. Roll dough out one more time and cut in to 5 x 10 cm rectangles with a rotary pasta cutter. Cut 2 parallel lines into the the rectangle (going the long way).
Heat oil in a pan (should be about 4 cm deep of oil). Fry each rectangle until it is golden in color and set onto paper towels to absorb the excess oil. When cool, dust with powdered sugar. Makes approximately 80 rectangles.
Per leggere questo post in italiano, cliccate qui.
Carnival Workshop
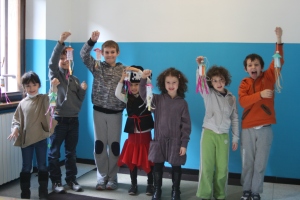
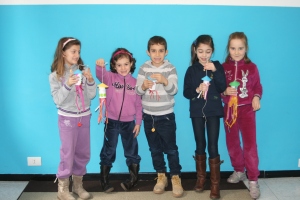
 It’s Carnevale (also known as carnival or mardi gras)! Time for chiacchere (a type of pastry eaten in the northern parts of Italy during this period) and confetti fights! It’s traditional to make masks for this holiday, but this year we wanted to do something a little bit different. This year the kids made Carnival Poppers. Once you have finished, you either have someone hold the Popper high above your head and give yourself a confetti shower – or even better… hold it above the head of an unsuspecting and have then him pull the sting and they will get a confetti shower!
Supplies:
- TP rolls
- colored construction paper (or some sort of fancy papers)
- cardboard (like an old cereal box)
- tissue paper
- stuff to decorate-pens, glitter, stickers
- confetti ( you can stretch this activity out by having kids cut up their own confetti)
- kitchen twine
- tape
- glue
- one bead per popper
- stick glue (school paste)
- Elmer’s glue
- craft needle
- hole punch
- things to draw circles: 1) a circle slightly smaller than the opening of the tp tube (we used a milk bottle cap) 2) a circle for the ‘roof’ of the popper (we used a tin can)
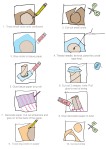
There are many steps to make the Carnival Poppers, so you can print out the instructions: above if you want. To make the Carnival Poppers, here’s what you do:
 Trace a small circle onto cardboard.
- Cut out the small circle
- Glue the circle to a small square of tissue paper
- Thread the needle with a short length of twine (approx 25 cm), tie a BIG knot at one end, poke through the cardboard circle and pull through. Glue the knot down (we used tape, but the knot slid out of the hole and the pull mechanism didn’t work).
- Glue the tissue paper to the tp roll, with the long end of the string hanging out
- Cut out 2 of the same shape (and size) from construction paper. Write Pull on one piece. Glue these ‘pull tabs’ onto the end of the twine.Cut a piece of paper large enough to go around the tp roll (approx 10 cm x 6 cm). Decorate the paper with pens, shapes cut out of paper, glitter. Cut strips out tissue paper and glue to the paper of your 10 x 16 cm rectangle.
- Glue the decorated paper onto the tp roll (streamers stride down).
- Now for the roof. Trace the big circle on construction paper and
- Cut out circle.
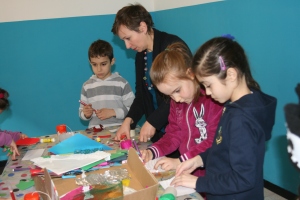 Decorate the roof.
- Cut a slit to the center of the circle. Bend into a cone shape and glue closed.
- Punch 2 holes on opposite ends of the tp roll.
- Fill the roll with confetti.
- Thread another piece of twine (approx 40 cm) through the two holes in the tube and then string on the bead (this is to keep the string centered).
- Thread the string through center of the roof (you may need to use the scissors to make the hole a bit bigger).
- This is the tricky part. Put a line of glue around the edge of the top of the tp roll. Slide the roof all the way down the string a lightly press until the roof stick on.
- You are finished!
Thanks to AlphaMom for this craft!
Morning Routine
Per leggere questo post in italiano, cliccate qui.
What do you do before school? Isabella has created this fun game to help you remember.
Preparation: you will need 6 copies of the cards above. Cut them out and then you are ready.
The Object of the Game: Memorize all the actions in the correct order.
How to Play:
- Shuffle the deck of cards and put them in the center of the table. Decide who goes first.
- The first player draws a card and puts it face up next to the deck of cards. He says what the person on the card is doing and does the action.
- The second player draws a card and puts it face up on top of the card the first player drew. First, she says what was on the first player’s card and does the action, then she says what is on her card and then does the action.
- The third player draws a card and puts it face up and on top the 2nd player’s card and so on and so forth.
- Play continues like this until one of the players makes a mistake (either by saying the wrong action, doing the wrong movement or says one of the actions in the incorrect order). If a player makes a mistake, he must take a card from the face up pile as a penalty. When all the cards from the deck are finished (or you have played for predetermined set of time), the game ends. The person with least amount of penalty cards wins.
March 3, I Like Bugs Workshop
Valentine’s Day Workshop
Per leggere questo post in italiano, cliccate qui.
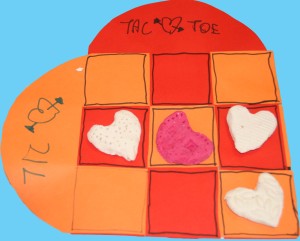 This was a fun Valentine’s Day craft that worked well for all ages. We made a Valentine’s Tic Tac Toe game. To do this you will need only a few simple items:
For the game board:
- 2 sheets of construction paper of 2 different colors
- a large dinner plate (to use as guide)
- pencil
- ruler
- scissors
- stick glue
For the markers:
- salt dough*
- 2 colors of tempera paint or food coloring
- glitter (optional)
- things with different textures (crocheted doilies, lace or corrugated cardboard, a plastic mesh bag from potatoes) or , rubber stamps with letters, toothpicks
To make the salt dough*
- 1 cup of flour
- 1 cup of boiling water
- 2 tablespoons of cream of tartar (this is optional, it helps to preserve the dough)
- 1/2 cup of salt
- 1 tablespoon of oil
Put all the ingredients into a bowl and mix. Be careful since it’s very hot. (If you are lazy like me, just dump everything into your stand mixer and use the dough hook :o). Divide your dough in half and knead in your colors and glitter. You may need to add a little extra flour if the dough becomes too sticky.
To make the game board:
- Use the dinner plate to help you draw a curved line at the top of the paper. Use a ruler to help you draw 2 lines equal distance apart, that will stop about 8 cm from the top.
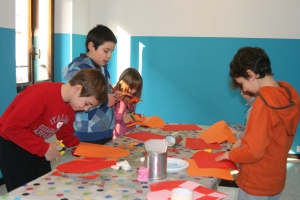 Now here comes the hard part: lay each the two pieces of construction paper one on top of the other and weave the pieces together. This is a good lesson in patterns – smaller kids may not be able to weave the pieces together by themselves, but they can tell you which color should go next.
- Glue all the end pieces down. Your game board is finished.
To make the markers:
 Divide each color of the salt dough into 5 balls (about the size of a very large walnut). You will have a total of 10 balls. (We used about half a recipe per kid).
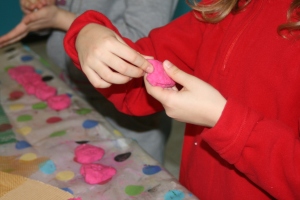 Use your hands to shape a ball into a heart shape. (You could use cookie cutters, but really kids love the opportunity to create and manipulate the dough on their own. Plus kids have so much more satisfaction when they have made the whole project by themselves). Make sure the the heart fits into the tic tac toe squares. Do the same for the remaining balls of dough.
- Press some of the textured materials and letters into the heart.
- We wrote some Valentine’s Day inspired sayings on the board for the to press into their hearts if they wanted to, such as:
- hugs
- kisses
- I love you
- xoxo
- be mine
 When the markers are dry, you are ready to challenge your friends to a game of Tic Tac Toe!
Thank you to Necco Sweehearts, Activity Village, and Alpha Mom for the inspiration.
Fishing For Alphabet
Per leggere questo post in italiano, cliccate qui.
- a plastic container with lid.*
- acrylic paint or construction paper
- kitchen string
- glue
- short dowels, sticks or chopsticks (one for each player)
- magnets (one for each pole)
- 26 paper clips
- the alphabet (you can use the one above, write them on bits of paper or cut them out of magazines)
To make the pond**:
- Decorate the outside of the plastic container with an underwater scene (if the container has slanted walls it’s easier if you paint it, if it has straight walls you can either paint it or cover it in paper). Ours is a combination painted and paper collage with a finishing layer of plastic wrap on to add a more watery look (ok, that’s not really the real reason…I was just looking for a quick and easy way to keep the little paper bits from peeling off sooner than later).
- Cover the lid with blue paper and cut a hole into the center. Put the lid back onto the container. Now your pond is finished.
Preparing the alphabet:
- Print off the alphabet page above and cut up the squares. Attach paper clips to each square.
Making the fishing poles:
- Cut off a short length of string, approx 10 in/25 cm. It can be made longer for older kids. Tie it to one end of the stick and put a dot of glue so the string doesn’t slide up or down.
- Glue a magnet to the other end of the string.
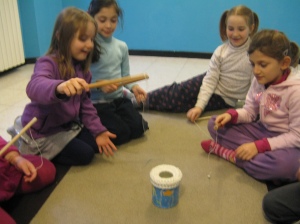 Now you are ready to play. Each player takes turn fishing the letter out, if he is able to read it, he can keep it. If he isn’t able to read it, he has to throw the letter back into the pond.
*I didn’t have a plastic container so I used a metal one – what was I thinking? The magnet kept sticking to the can! I put in a layer of craft foam to correct this. Another problem with using a can instead of a plastic container with a lid, meant I had to make a lid, so ours is crocheted in case you are wondering why our can looks like it has a big tea cosy on the top. A round circle ‘doughnut’ shaped piece of paper would have been easier to correct the problem, but would have lasted for only a few classes.
**You could easily skip making the pond,especially if you are making the game for little kids and just place all the letters face down on the floor. But, the pond adds a bit of a challenge and the kids think its fun. We play this game with all our other vocabulary words to, like words from the Dolch word list.
Carnival Workshop February 18
Chicka Chicka Boom Boom Workshop
Per leggere questo post in italiano, cliccate qui.
We read Chicka Chicka Boom Boom to get the kids familiar with letters in English. (Instead you get Miss Tracy from Little Story Bug :o) It’s a fun a rhythmic story all about letters! And then the kids go to decorate the letters of their name.
 Here’s what you will need: pipe cleaners, yarn scraps
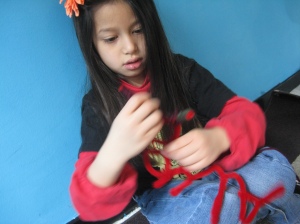 1. Use the pipe cleaners to shape the letters of your name. (If you run out of pipe cleaners just take another one and twist the ends together and keep going). This was actually quite a challenge trying to figure out how to keep all the letters joined together, even if the kids wrote their name in cursive.
 2. Then take a bit of yarn (we used anywhere from a foot to 2 feet) and start wrapping. Try and wrap in a way that the end of the piece of yarn you are using and the end of the old piece of yarn get tucked underneath. If you can’t just make sure you tuck the ends under one strand as you finish, so your letter won’t unravel later on.
 3. Don’t get bent out of shape if your letters got bent out of shape, just reshape it back into the correct position. The yarn will help the letters be stiffer and hold their form better. Now you have your name written in really cool fancy letters!
There weren’t too many steps to make this project, so it sounds like it’s pretty easy, but it’s actually pretty challenging. It’s not easy to make all the letters of your name join up and then it takes a lot of hand eye coordination and fine motor skills to finish the project. So good luck and have fun!
Chicka Chicka Boom Boom is also a song:
Just for fun, here is the hip hop version:
Thanks to Bloesm Kids for the artistic inspriation!


